Setting up Ubiquiti Bullet as a WiFi Base Station
This post will help you set up a Ubiquiti Bullet as a WiFi base station, and includes best practices for surge protection, and cabling.
When should I use the Ubiquiti Bullet?
The Ubiquiti Bullet series is a high powered 2.4GHz or 5.8GHz outdoor radio (denoted M2 or M5 respectively).
With a cylindrical "bullet" shaped form factor, it's designed to sit inline between an Ethernet cable input and a WiFi antenna output.
Being completely independent of antenna choice provides a high degree of flexibility during integration, allowing you to swap antennas to best match the surroundings, and hide the radio from view, or protect it from harsh/hazardous environments.
Like all Ubiquiti equipment, the Bullet is capable of being set in any wireless mode - access point, station, bridge, router, AirMax (for P2P/P2MP) AP/station.
In this example, we're setting up the Bullet as a high powered 600mW WLAN to allow any laptop, mobile phone, etc. to access the local network & Internet.
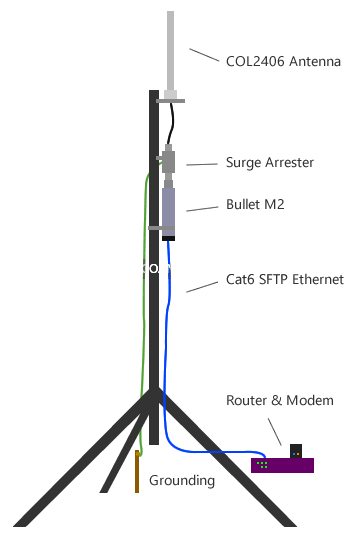
While this configuration is quite universal, in the demonstration we're setting up this gear on a tripod - similar to what we've provided for many government & research teams setting up temporary wireless access in remote sites.
The following list of equipment was used in this example:
- Ubiquiti Bullet M2 Titanium
- Phaseblocker Inline Surge Arrester
- RFI COL2406 6dBi 2.4GHz Antenna
- Cat6 SFTP Shielded Ethernet Cable (assorted lengths)
- Dovado Pro 3G/4G Router
- Telstra 320U 4G Modem
While the Bullet has full router capabilities, the majority of us will not be using it in this way, so to demonstrate its capabilities, we're setting the unit up as an Access Point in Bridge mode, so packets will be passed to the Dovado router untouched (no NAT, DHCP, etc).
Choosing an Antenna
Naturally choosing an antenna depends on the desired application, with the most common consideration being the desired coverage area.
Choosing a directional antenna over a non-directional (omnidirectional) antenna should be self explanatory - with the former providing a stronger signal in one direction, by trading off for a weaker signal in other directions.
Antenna gain is not so obvious, and given the strict Australian maximum power limits (EIRP), is an important consideration.
If you've read our other antenna guides, you'll know that an increase in gain (dBi) can only be achieved by focusing signal - in the case of an omnidirectional antenna, signal is focused outwards horizontally, reducing signal power transmitted above and below the antenna.
There's a common misconception that the 2.4GHz ISM band is "unlicensed" in Australia, where in reality the ACMA regulates it with a 'Class Licence" which basically states that anyone can operate on the band provided they stick within the conditions imposed by the ACMA, such as obeying power limits.
The maximum EIRP limit for 2.4GHz in Australia is 4000mW (36dBm). The real world implication of this is the Bullet M2 has a 600mW (~28dBm) output power, so the maximum antenna size we can use is an 8dBi antenna (well, depends on cable losses).
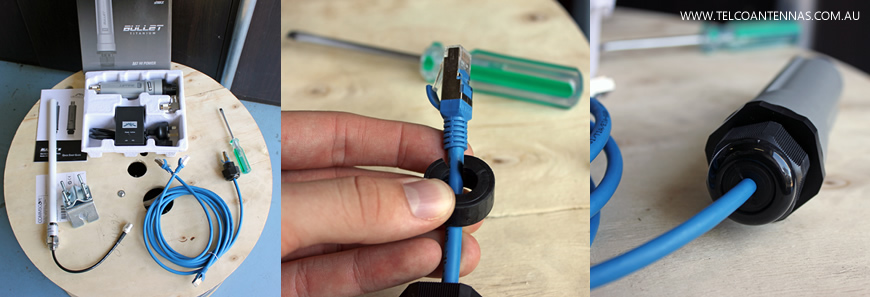
Setting up the Bullet M2
Like all of Ubiquiti's PoE powered equipment, the Bullet has a single Ethernet input. The waterproofing gland slides over the cable, and the cable is inserted in the base of the Bullet.
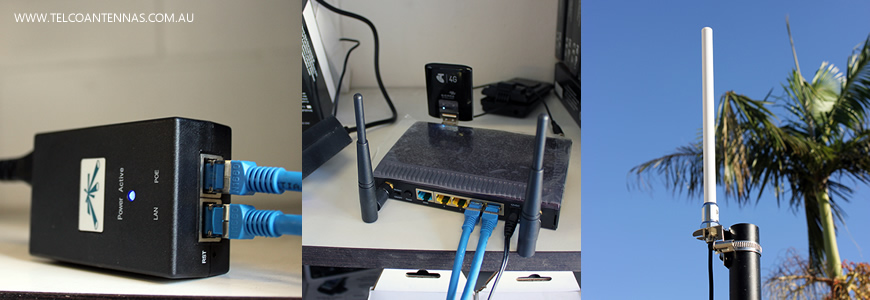
In this example, the other end of the Ethernet cable is connected into the PoE injector, which in turn, is connected to the Dovado Pro (with 4G USB modem) to provide WAN + LAN connectivity.
WLAN was switched off from the Dovado to limit channel interference, due to the presence of several other WiFi access points in our test location.
If we didn't have a suitable router, we could have connected the Bullet directly to the laptop and allowed the computer to share the 4G connection to the Ethernet port. In this instance, we would have set the Bullet in 'Router' or 'SOHO Router' mode instead of Bridge mode.
The 6dBi RFI COL2406 antenna was chosen as it tends to be a good all-rounder - its durable, has a low profile with good omnidirectional pattern, and is stud mounted, making it easy to attach on any 13-16mm hole diameter bracket.
Weather Protection
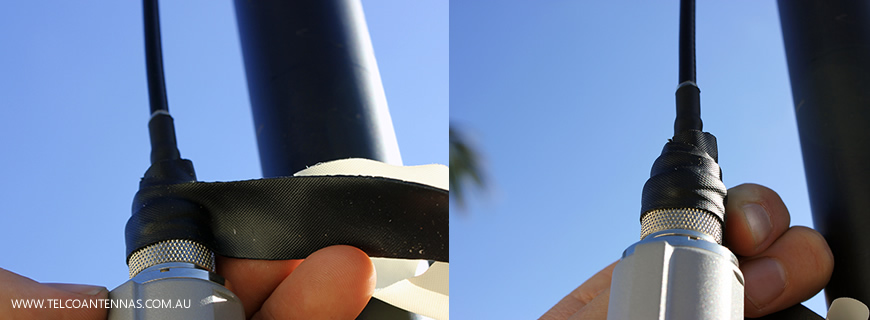
While the base of the Bullet is sealed with its supplied cable gland, make sure you don't overlook the N-Type connector on the top of the radio, which requires sealing against moisture ingress.
Self-amalgamating tape such as Coaxial Cable Waterproofing Sealant Tape is an ideal choice of sealant tape. When applying, it's important to keep the tape under tension, and overlap each wrap by about 50% of its width to ensure a good seal.
It's important to begin sealing the connection from the cable all the way to the top of the radio - any exposed part of the N connector from the crimp ferrule to the radio, is potentially a point of ingress.
After wrapping the connection, work the tape with your fingers to eliminate any gaps between the overlapping folds.
The effects of improperly weatherproofing connections can be minor to severe - the most common symptom being a change in impedance resulting in higher VSWR, resulting in less power transferred from the radio to the antenna.
In the lower layers, this can reveal itself as a reduction in modulation rate or a reduction in code rate, as link adaptation compensates for lower channel power.
Surge Protection
Don't risk your radio! Network continuity should not have to be disrupted every time there's a chance of storm activity.
While no form of surge protection will protect against a direct strike, a good quality coaxial arrester can protect against the devastating effects of an electrical surge.
The majority of damage to electrical devices is the result of the electromagnetic pulse (EMP) generated from a nearby lightning strike, which parasitically couples onto any vertical/near vertical metal object (cables in particular), often called 'lightning transients'.
Coaxial surge suppressors/arresters (the terms are interchangeable) should be installed as close to the radio as possible.
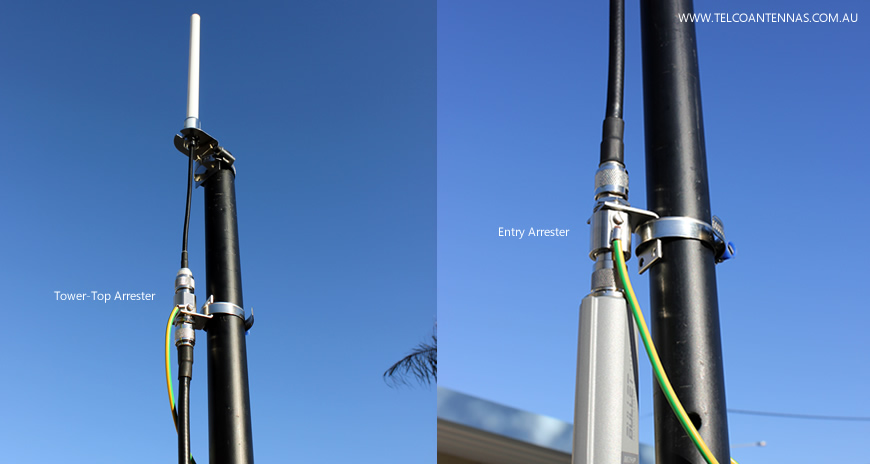
In the case of our installation, where the Bullet is mast mounted, we have only a short tail of coax to worry about, so only a single arrester is required.
If however, we were hiding the radio in a building or equipment cabinet, and had several metres of coaxial cable, then a second arrester, often called the "tower-top arrester", should be installed between the antenna and feeder cable.
Lengths exceeding 30m may benefit by installing a tertiary arrester or mid-span grounding kit, half-way down the feeder.
The images below show a typical installation when using a LMR400 feeder cable (ignore the hose-clamps that are temporarily set it up for the demonstration).
Web Configuration
Now that the hardware has been completely installed, it's time to configure the Bullet to act as a WiFi Access Point.
Configuration is performed using your web browser, by typing in https://192.168.1.20.
You'll get a warning pop up stating that the device has presented an invalid SSL certificate, due to the certificate being self-signed and not issued by a CA. This is normal so just hit accept/continue.
After this, you'll need to log in with the default username and password "ubnt".
Configure the Wireless tab
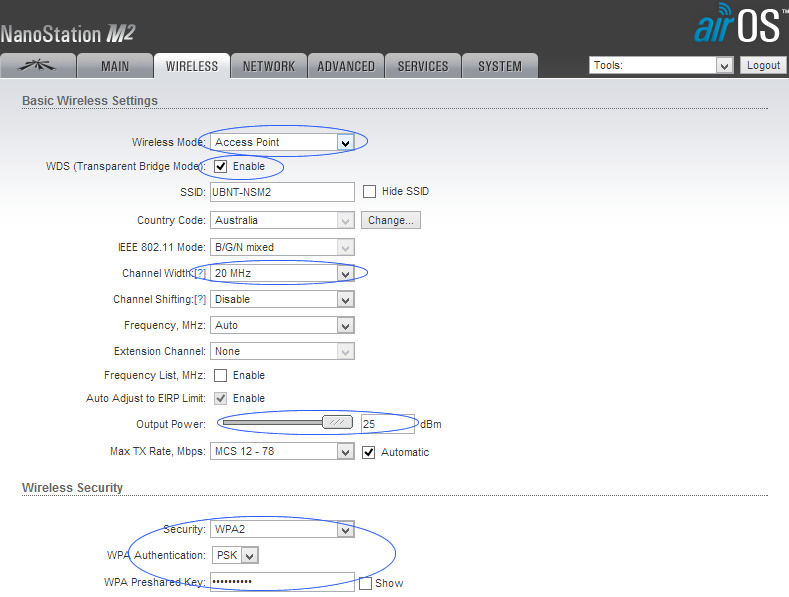
The first step is to configure the Wireless tab so the Bullet acts as a WiFi Access Point.
Change the settings according to the below picture.
Be sure to set up the device with WPA2 security and an appropriate WiFi password here.
You can use this tab to adjust the power output, should you wish to cover a smaller area.
The default channel bandwidth is 40MHz, but some older devices, such as wireless printers and mobile phones, cannot operate on 40MHz, so we've changed it to 20MHz in this setup.
WDS mode is not required in this instance.
Turn off airMAX
Navigate to the left-most tab (with the Ubiquiti logo) and uncheck the airMAX checkbox to disable Ubiquiti's proprietary airMAX protocol (a special MIMO TDMA multiplexing technique that allows communication between two or more Ubiquiti devices).
You won't be able to untick the box until the Wireless tab has been completely configured.
AirMax has the ability to increase wireless channel usability from 30% (on 802.11n) to as high as 90%.

Configure Network Settings
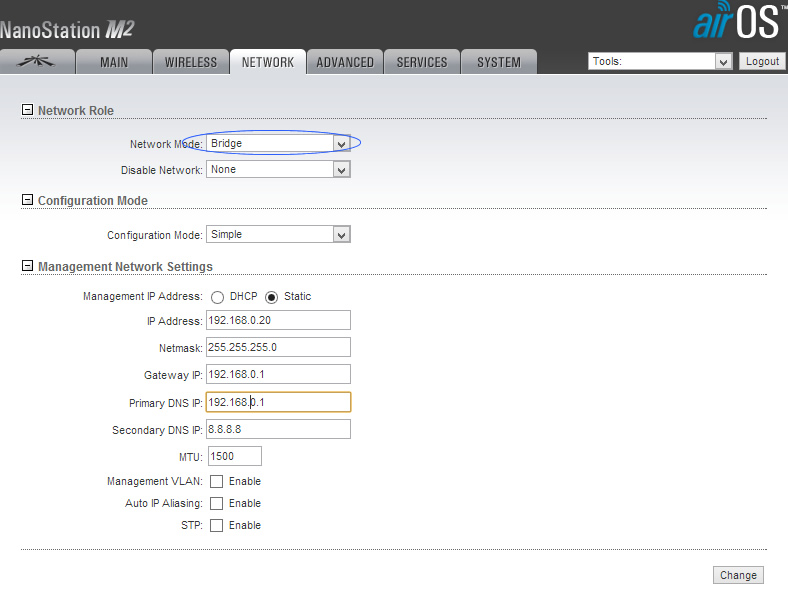
In this case our Dovado router is located at 192.168.0.1, with a subnet mask of 255.255.255.0, meaning all our devices are restricted to the 192.168.0.XXX subnet.
This means that we've had to change the default 192.168.1.20 to 192.168.0.20.
As we want the Dovado to continue controlling the network. we're setting the Bullet to Bridge mode, and then assigning the Default Gateway and DNS IP addresses to the address of the router.
We've also switched off the Dovado's WLAN, just to free up some spectrum, as we've already got a collocated ADSL WLAN, which wouldn't have left much space for the Bullet.
Performance Comparison
To assess performance we're going to test the Bullet M2 versus the more substantial Rocket M2 setup.
Our location in a mixed commercial/residential area is an ideal proving ground to demonstrate resistance against co-channel interference (i.e. collocated AP's, residential WiFi, etc.), multipath propagation through dense urban environment consisting of both trees and buildings.
Both the Bullet and Rocket were mounted (at separate times) on the same mast, which was positioned indoors at the roller-door entrance of our warehouse.
A walk-test was conducted using a simple program called inSSIDer, which provided dBm readings of both our test AP and neighbouring (interfering) AP's, along with good old fashioned command prompt, to provide some basic packet loss statistics.
Performing a simple ping test is a great way to test link conditions - ICMP does not have a guaranteed delivery mechanism, so deteriorating radio conditions are instantly obvious.
Ideally a more comprehensive WiFi test should be conducted with JPerf/IPerf, but here I'd prefer to demonstrate some basic stats that can be collected on your home network without requiring any extra tools.
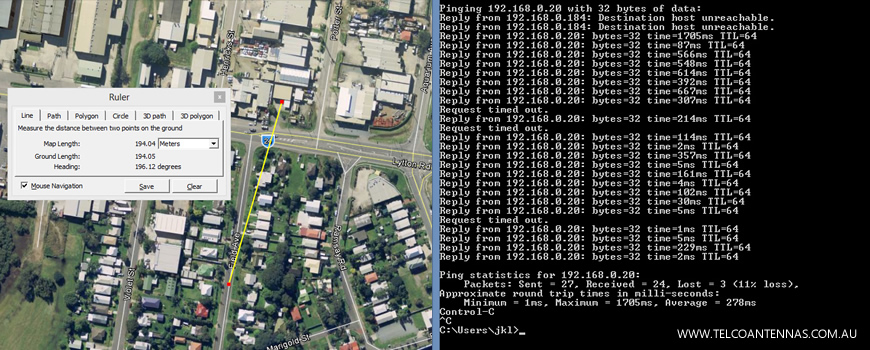
Bullet Range
The Bullet M2 had a stable range of about 150m through a typical suburban non-LOS environment.
Range extended out to about 200m if higher packet loss was tolerable (11% loss @ 194m) - this sort of loss might be acceptable for a simple telemetry station, but not for bandwidth intensive applications.
With a range of about 400% greater than a normal WiFi access point, this is quite a good result, especially in the presence of 24 detectable and 6 overlapping access points.
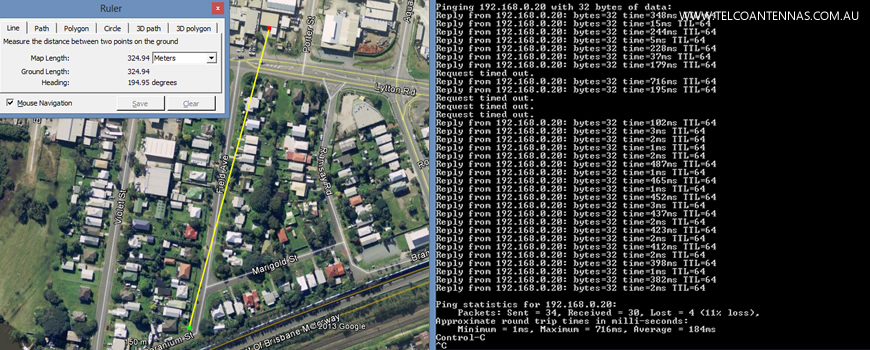
Rocket M2 Range
Before we begin, it's important to note that this may be a somewhat unfair comparison - the smallest available Rocket M2 base station antenna is 10dBi.
To compensate for the higher gain, we reduced the dBm output by 4dB, however as the radiation pattern differs, this should not be overlooked.
Walking out to the 194m mark, where we experienced an 11% packet loss previously, this time not a single packet was lost.
We walked out to 325m, before similar levels were experienced, with a usable range of about 275m. Both maximum and average latency were also significantly reduced - by almost half that of the Bullet.
Conclusions
While this simple demonstration should in no way be considered (and was never intended to be) empirical in nature, it's quite clear that the Ubiquiti Rocket outperformed the Bullet in both range and reliability.
While the Rocket does not employ smart antenna techniques, such as beamforming, multiple antenna technology, it clearly provided an advantage over a single antenna WiFi radio, not surprising in an environment relying entirely on radio scatter.
Ubiquiti Bullet is an ideal compact form factor WiFi solution, suitable for a much more diverse range of applications and environments. However, for maximum range and performance, the choice is still Ubiquiti Rocket.