Guide to Locating a Phone Tower
How to use this guide
This guide will help you locate your nearest phone tower and select a suitable antenna.
Use this guide for areas where a weak signal is already present.
Do not use this guide for locations where there is no signal or where there is highly complex terrain. We offer a formal computer survey, that uses highly advanced computer software, to help you with more complicated solutions - refer to our Detailed Assessment Booking
Before you start
You will need:
-
Internet access
-
A street address, or GPS coordinates
Diagosing the problem
As you may know, the terrain surrounding your location, its density and depth of vegetation, and distance to the nearest tower, are often the main reasons behind your weak signal strength. So your location (city/regional/remote) and its terrain (hilly/flat/trees etc.) will determine the type of antenna you'll need.
Step 1
First things first: let's check the area where you're having the problem - we do this by using Google Earth - this provides satellite imagery of your location, letting us see the terrain in 3D.
Along with Google Earth, we'll use an Australian tower locations provided by the Radio Frequency National Site Archive (RFNSA).
On this site you can type in our post code, and see a map of the towers surrounding the area. By combining the locations from this website with Google Earth, we will to get a better look at your situation.
If you haven't already installed the Google Earth on your computer, you can Download Google Earth
Once installed, opening Google Earth will look like this.
Now we're going to look at your location. Type in your address in the 'Fly To' box.
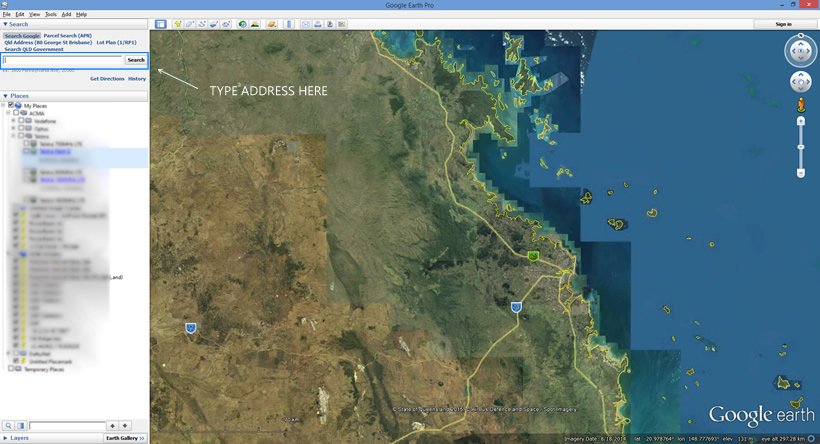
Google Earth should now look something like this.
Google gets about 60% of rural addresses slightly incorrect, you may need to pan around to find your actual house location.
It can help to locate identifiable roads or landmarks and zoom in from there.
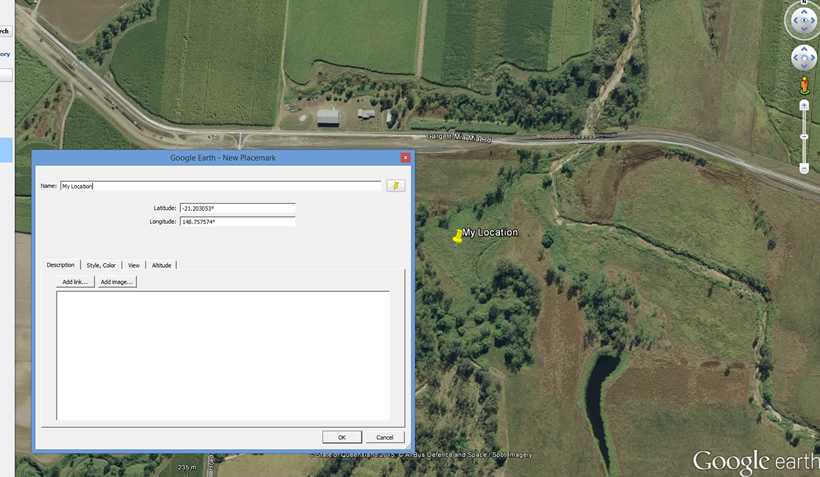
Once you've located your house use the thumbtack symbol to "Add Placemark" on your address.
This is used to save your location and also to determine the GPS coordinates of your house which you may need later.
Step 2
OK, now we need to find the GPS locations for the towers near your address. To do this, go to RFNSA Homepage.
When you first open the site, it will look something like this.
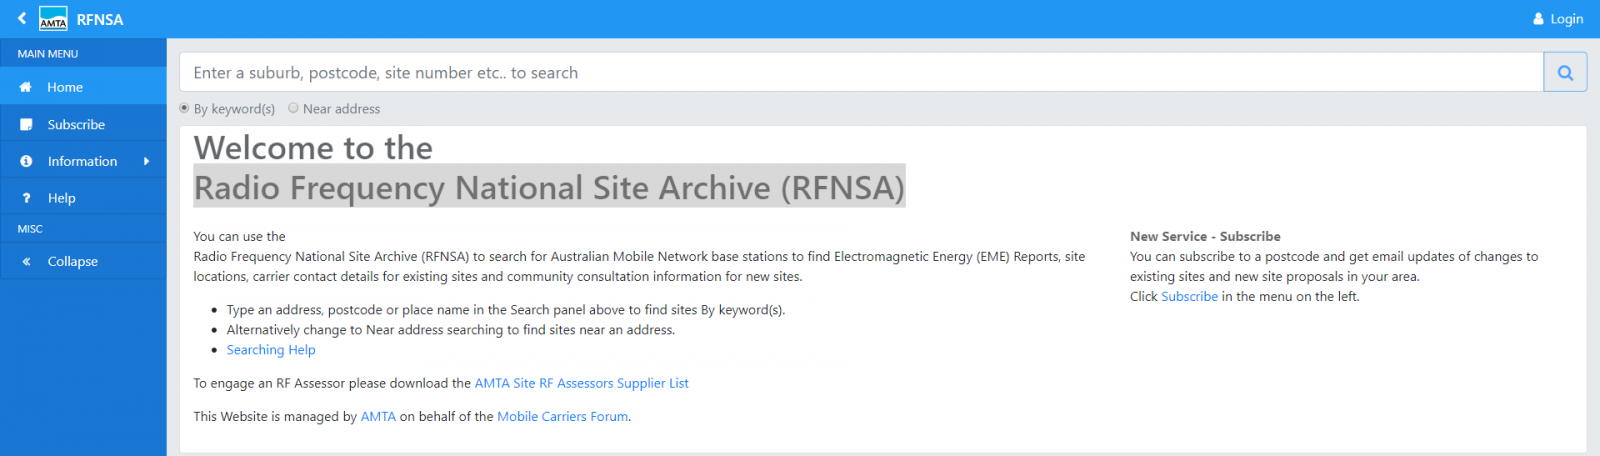
This website is super easy to use - simply type in your postcode or suburb in the box, and hit the search button.
The next page will display a table of all base stations in the area, as well as the networks (Telstra, Optus, etc.) and frequencies used at each site.
It's important to know that not all these towers are in use, as this website shows both current and proposed base stations.
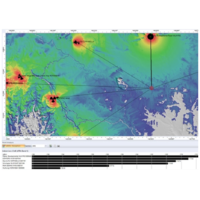
Some people find it easier with a visual representation of the tower locations - to do this simply hit 'map view'.
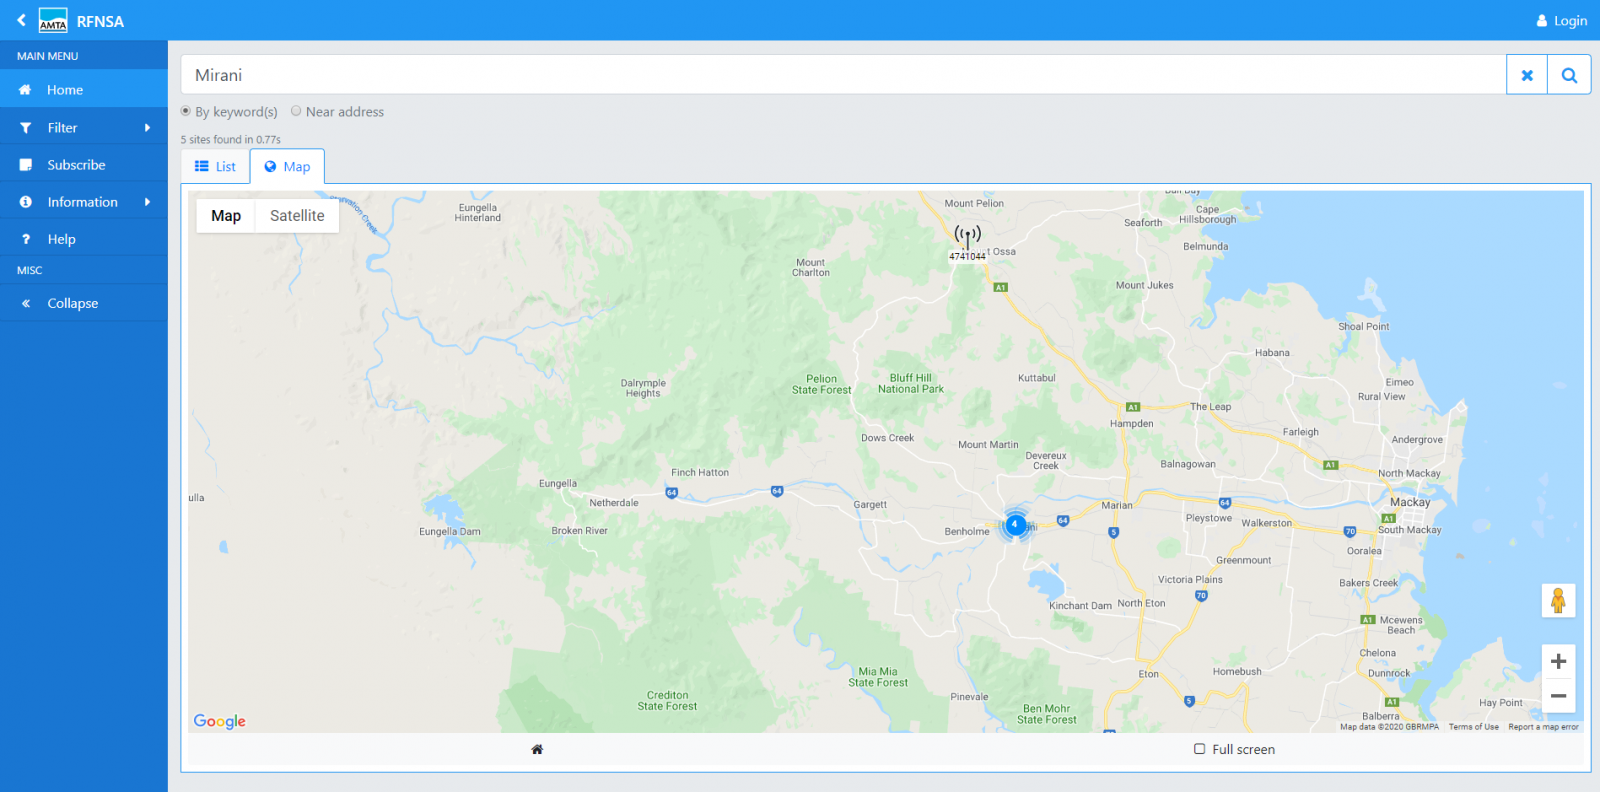
Base Stations that are situated in a position with no other Base Stations exist will appear as this figure:

Base Stations that are clustered within a small area are depicted by the following figure:

The number of Base Stations is indicated in the middle of the cirle.
In order to differiantiate between the clustered Base Stations you will just need to click on the figure, the map will then Zoom in showing the individual sites.
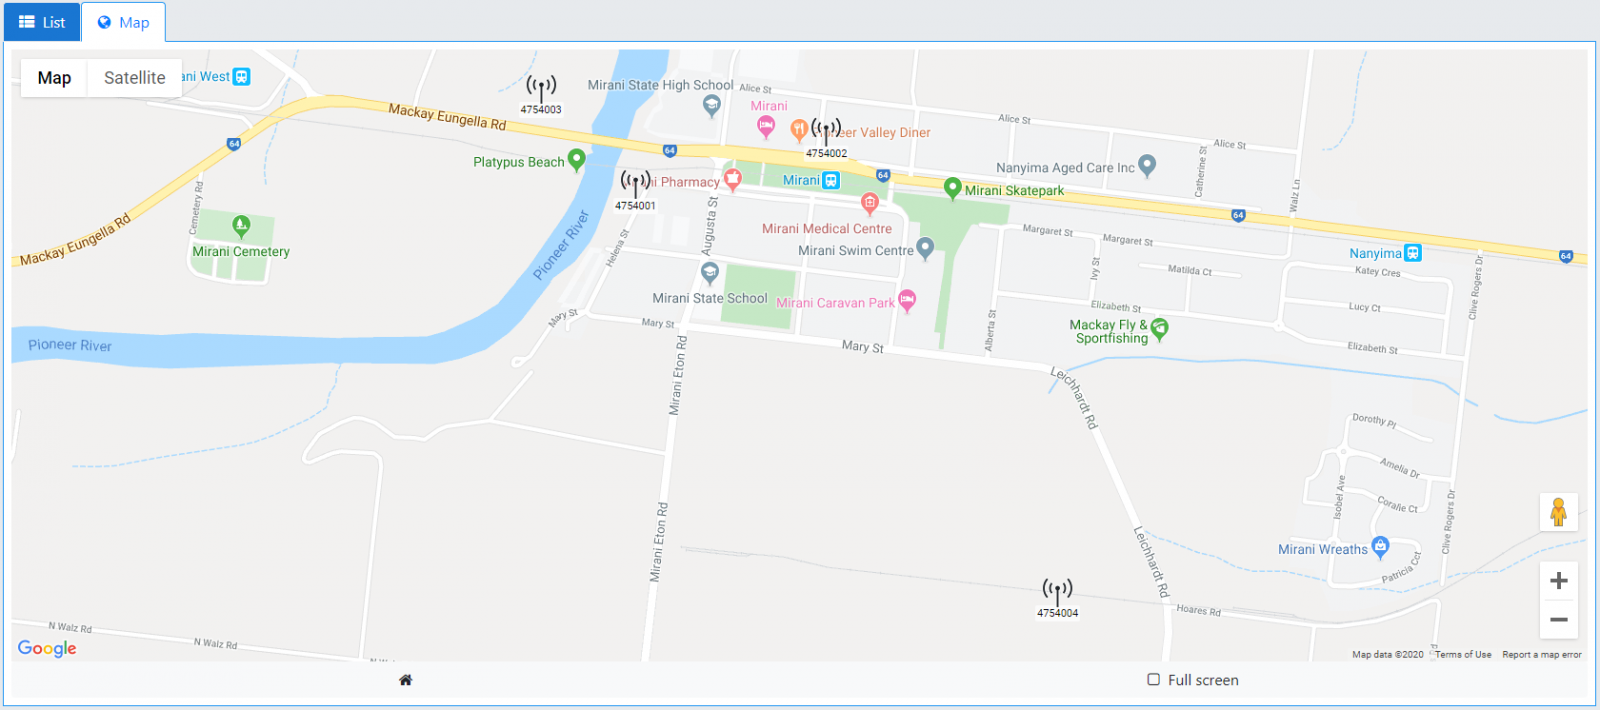
To identify what services are available from each site, simply click the tower which will display the network and frequencies in use.
While a comprehensive identification of all relevant towers in your area is best, you can use your local knowledge to rule out towers that are not likely to be receivable, due to the presence of significant terrain obstructions.
As you can see above, we've identified a Telstra Base Station which provides Next G (3G) and 4Gx (700Mhz) services. .
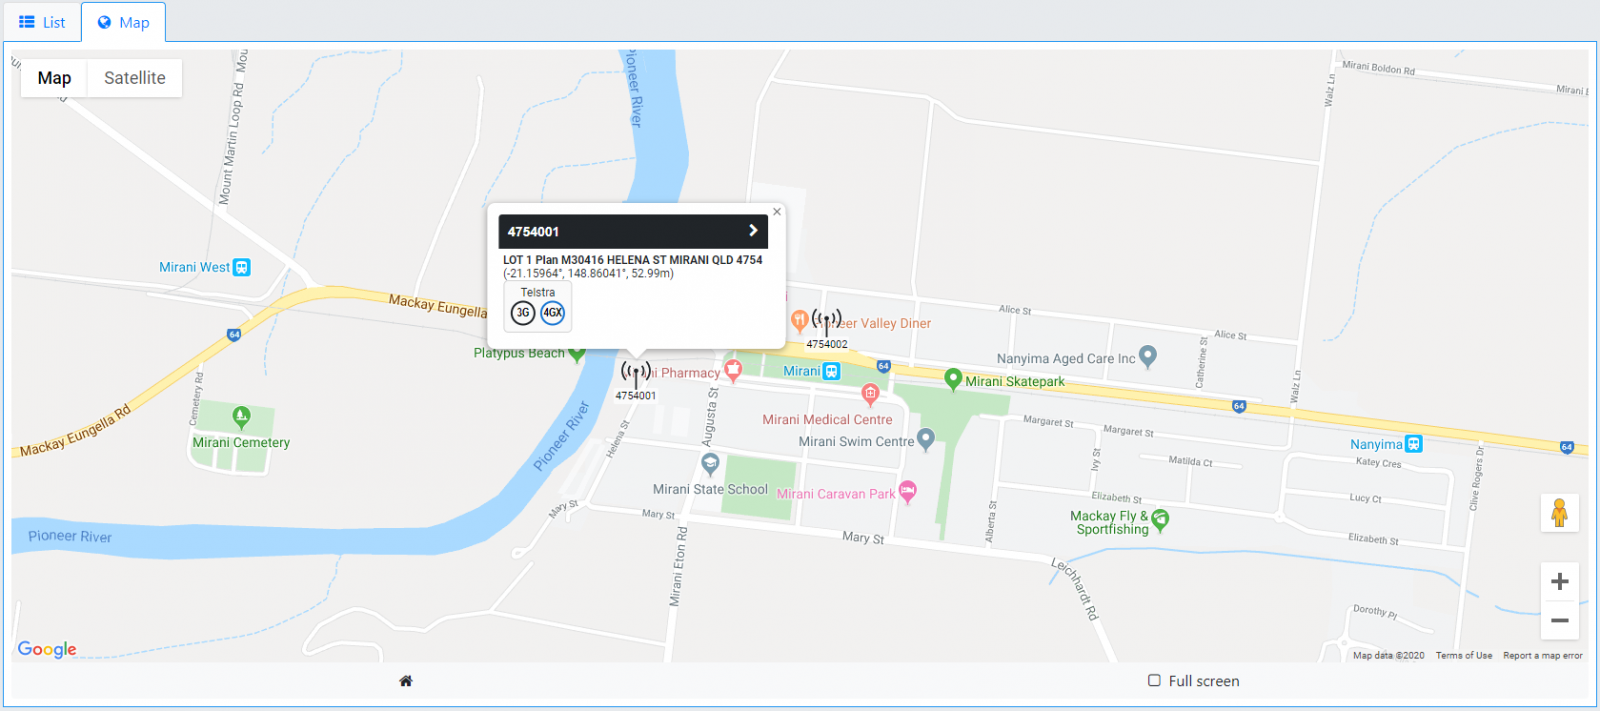
You will then be able to copy the GPS Coordinates of the Tower shown in the pop up, and paste them into Google Earth.
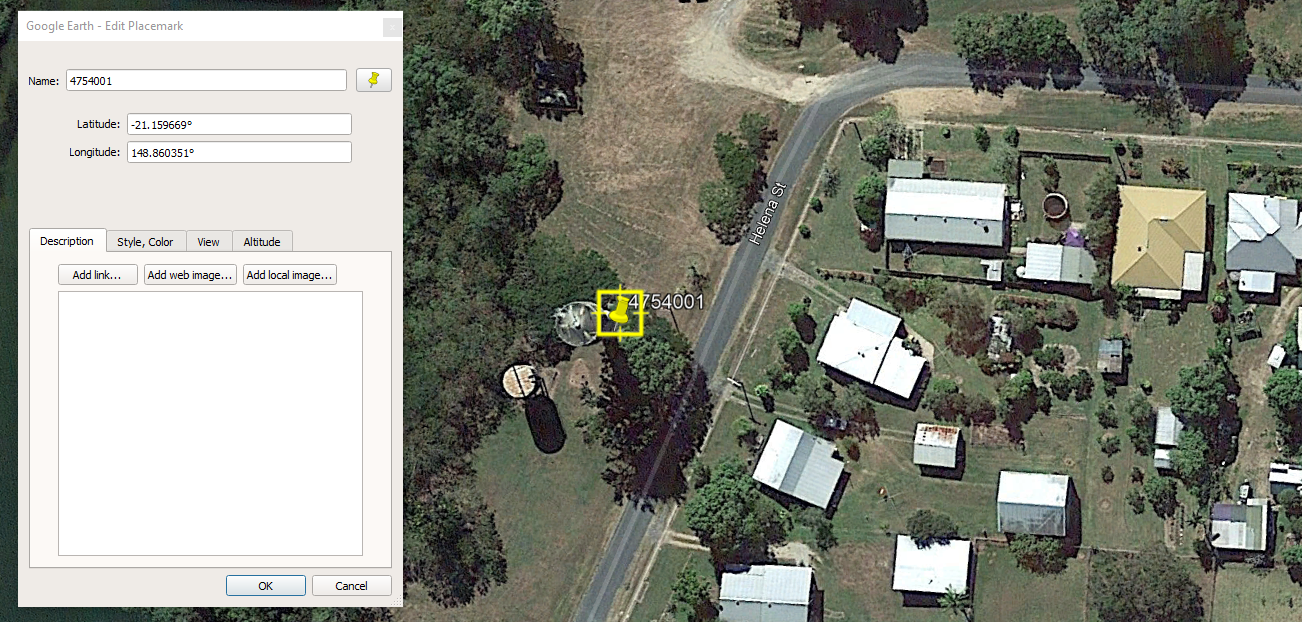
In this case we've copied the GPS Coorindates of the Tower "-21.15964°, 148.86041°".
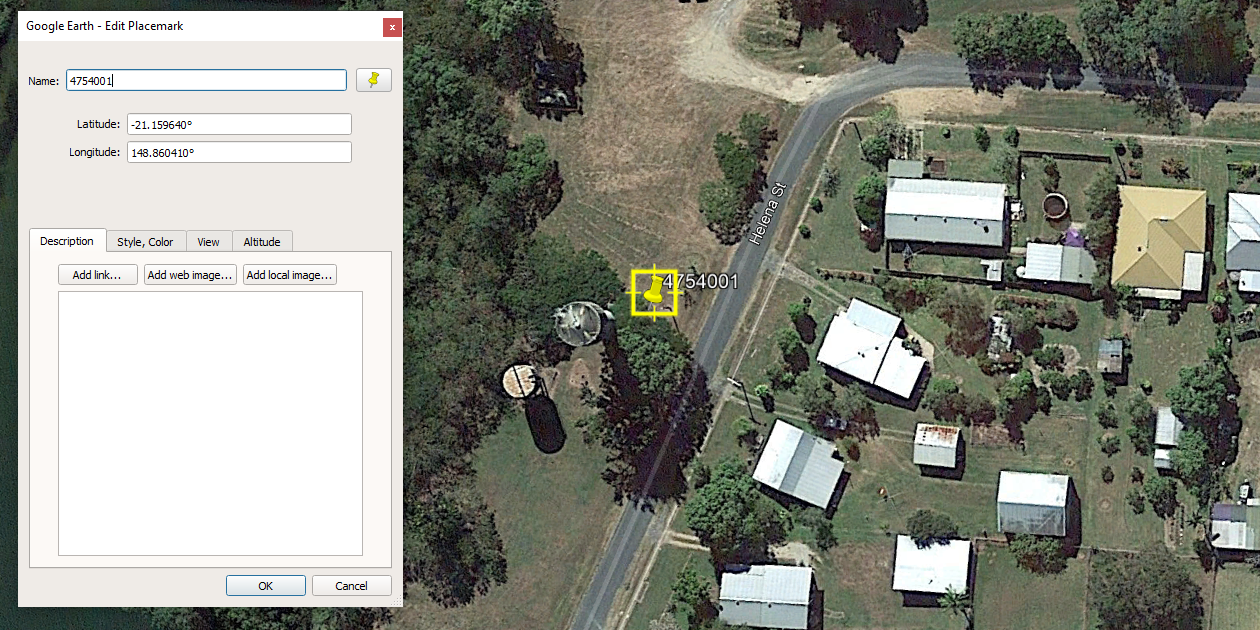
As you can see below the GPS Coordinates may be a little off, so you may just want to move the Pin and Drop it directly over the Towers location.
You'll need to repeat the process for all relevant towers that are likely to be in range of your address, out to about 40-50km in most cases.
The best tower serving your address is going to be the one with the least terrain obstruction, and the least vegetation the signal must penetrate through to reach your location.
Step 3
Here we will assess the terrain between you and each tower.
To do this, we will make use of some of the powerful tools built into Google Earth.
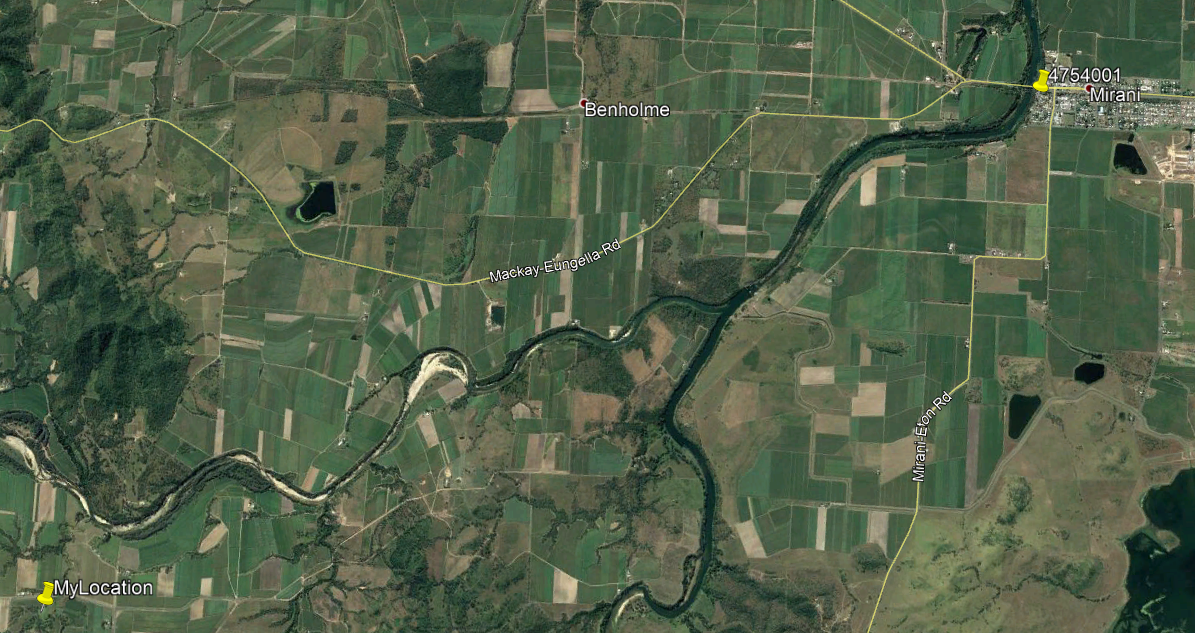
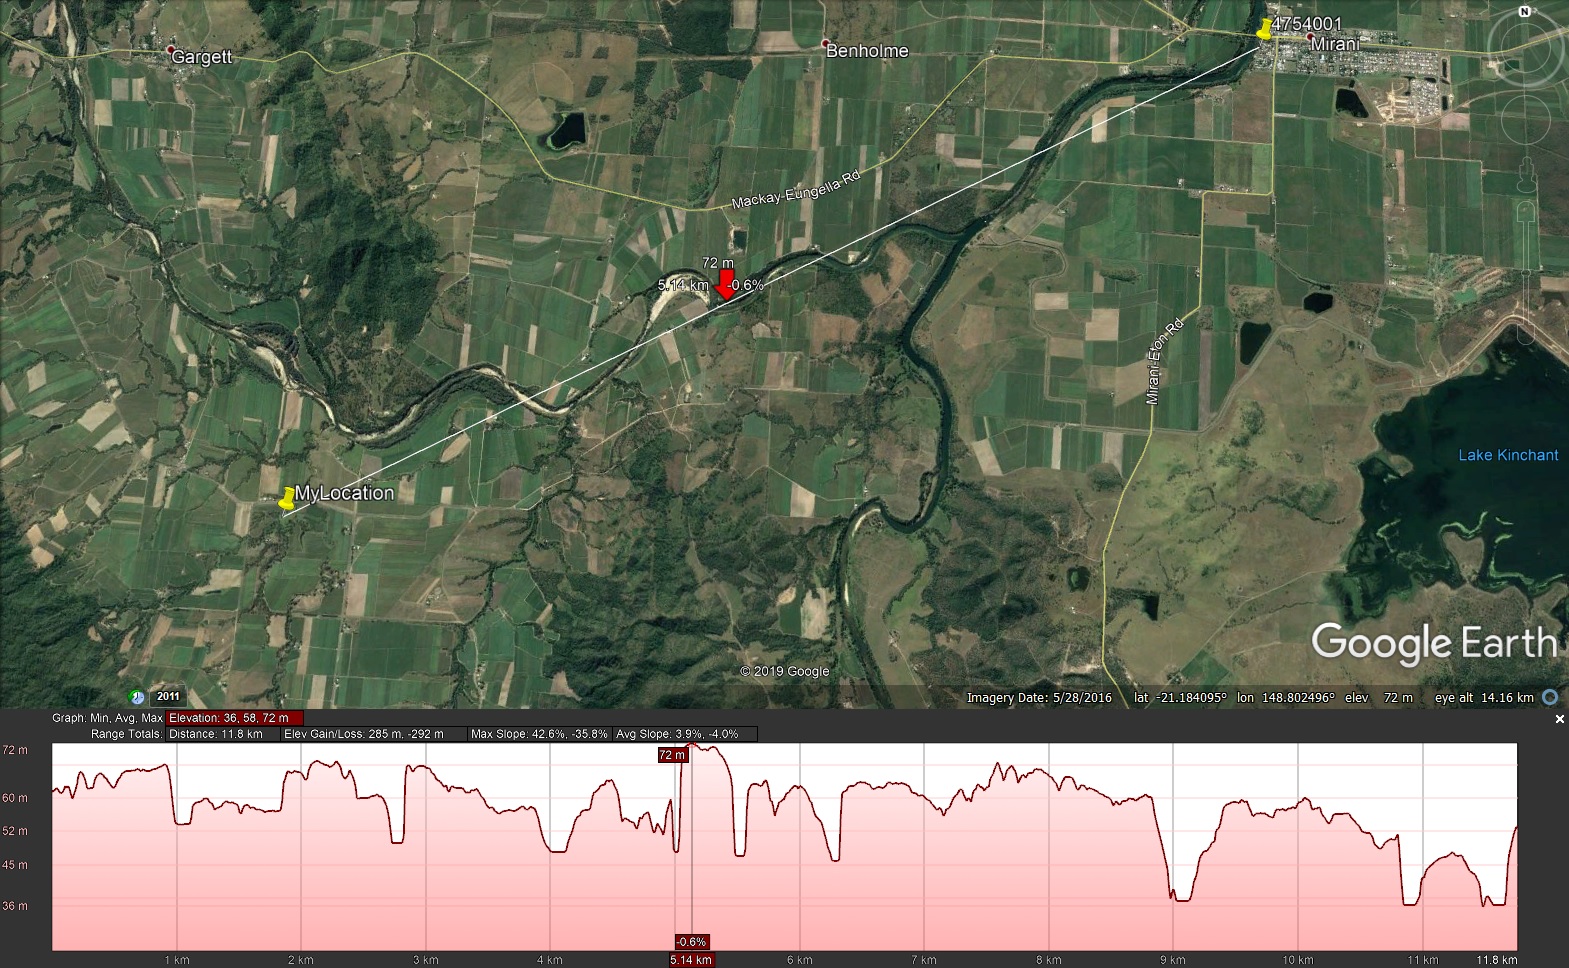
While in Google Earth, zoom out to a distance where you can clearly view both your address and the tower in the picture.
Select the 'Add Path' button. This will bring up the box shown in the image below.

A colour such as red or white may help improve the visibility of the path on the map. Do not click ok just yet.
Click once on your address, and then click on the tower - this will draw a straight line between the two points.
Now click the ok button.
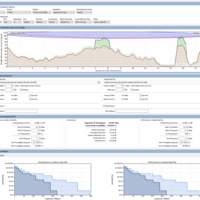
All we need to do is right click on the line and select 'Show Elevation Profile', this will graph Elevation against Distance between the two points.
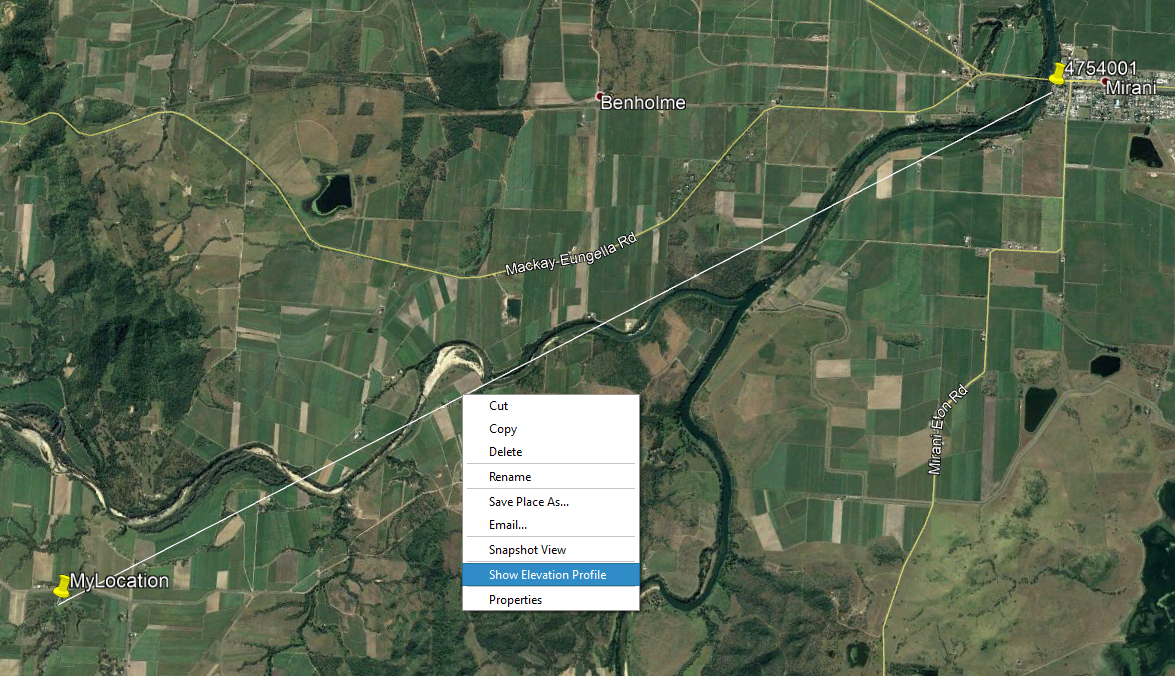
We will use this to determine if there are geographical obstructions between the two points, and determine the appropriate gain antenna based on the obstructions and environment.
We can also use the navigation tools on the right hand side of the page to view the terrain in 3D.
This can be used to virtually examine the terrain if you're assessing an unfamiliar location.
It's important to identify the locations of dense vegetation and large groupings of trees that obstruct the path.
This process should now be repeated for all relevant towers in the area, with the tower that appears to have the clearest transmission path selected as our candidate.
Step 4
Before choosing an antenna, it's important to understand why signal strengths might be poor.
Mobile phone and wireless broadband uses a radio frequency transmission to reach your area. Ideally all transmissions should have a clear path from the transmitter (tower) to the receiver (you), as this is rarely the case, radio waves tend to 'bend' over the tops of hills (a process called diffraction), or bounce of nearby buildings or hills.
Radio waves can of course penetrate through vegetation, however the more bush land the transmission must penetrate through, the weaker they become.
Likewise the greater the angle the transmission must bend, i.e. over hills, or the more acute the angle must bounce, i.e. off a hillside, the weaker the signal you'll receive.
Consequently signal is quite poor at this location due to the very low ground clearance and as such high levels of vegetation the signal must pass through.

This location isn't too bad given that most of the area is farmland, however if this location was in a forested area, it's likely no service would be available whatsoever.
Step 5
The key to selecting the right antenna is to ideally use the highest gain antenna possible. However, depending on the transmission environment, highest gain is not always the best.
Why? Well using a high gain antenna focuses signal into a very fine angle called beam-width, so the higher the gain, the smaller the receiving angle.
Beam-width is essentially the antenna's aperture, meaning any signal scattered through trees or bouncing off nearby hills outside this angle, won't be picked up by the antenna.
Normally, because we're dealing with very low ground clearance and only a moderate-short distance we would need to maintain a reasonably wide receiving angle (wide beam-width) to ensure we capture signal that's scattered from all the ground based obstructions.
While this would provide a reasonably good performance connection, we can go one better by improving ground clearance and thus minimising the cause of the problem.
To do so, we would install a decent roof mast, perhaps a 2-3m mast installed on top of our ~3m roof to achieve 5m of ground clearance.
From this point we can now use an antenna with a gain as high as we'd like.
Remember, the Base Station in Mirani had both 3G and 4Gx services, this means we can achieve good mobile phone coverage throughout the house, and very high speed 4Gx internet.
The two kits we might select would be:
-
Mobile Phone Coverage: Telstra Repeater Kit for Regional Areas
-
4G Internet: Telco XPOL MIMO 3G+4GX High Gain Panel Antenna - 700-900 MHz
That's pretty much all there is to it.
Of course this is a reasonably simplified way of locating nearby towers and determining a suitable antenna, and should only be used in areas where signal is already present.
For a detailed and accurate assessment of your area - you cannot beat a formal survey of your location. We provide surveys with a customer satisfaction guarantee.
Over to you!

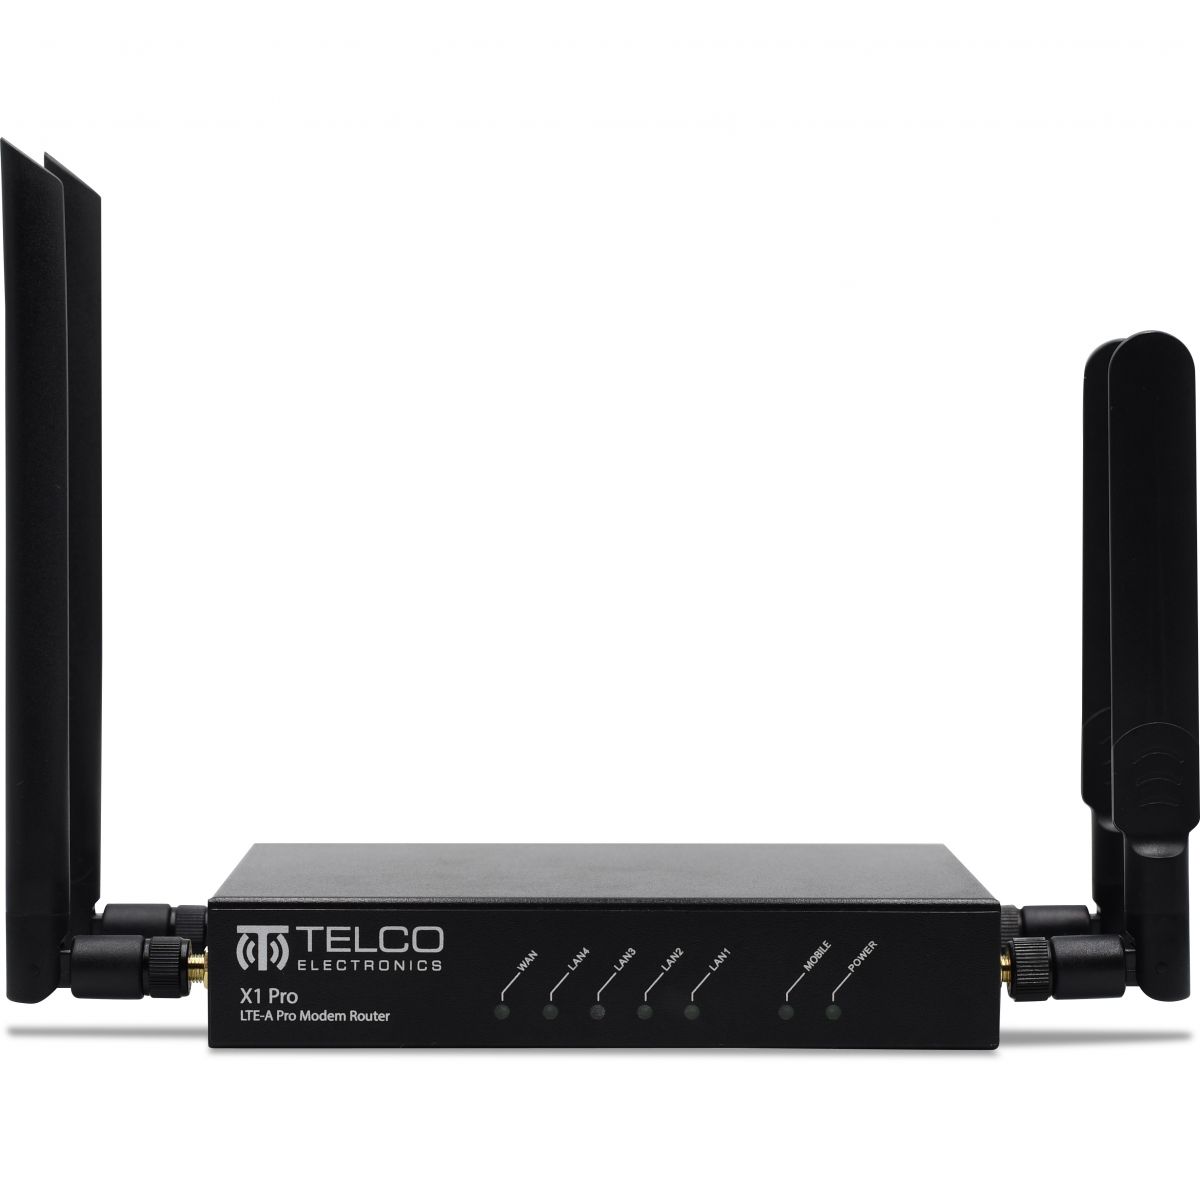
Need a high speed internet connection?
Our Telco X1 Pro and Telco T1 are perfect for getting high speed internet where the NBN does not reach, and have bulit in tools to help you optimise your mobile data connection.
 |
 |